Building a Security Compliance Lab from Scratch: Part 1, Infrastructure Setup
Security frameworks show up on almost every cybersecurity job description. NIST CSF. ISO 27001. NIST 800-53. Whether you’re going for a SOC analyst role, a security engineer position, or a sysadmin job that’s shifting toward compliance work, there’s a good chance they’ll expect you to know at least one of them. Reading about these frameworks is one thing. Being able to say you built a lab that demonstrates them is a different conversation entirely.
So I built the lab.
This is Part 1 of a three-part series. By the end of Part 3, I’ll have a fully segmented SOC environment mapped to both ISO 27001 and NIST CSF 2.0 controls with real audit evidence to back it up.
The Lab Design
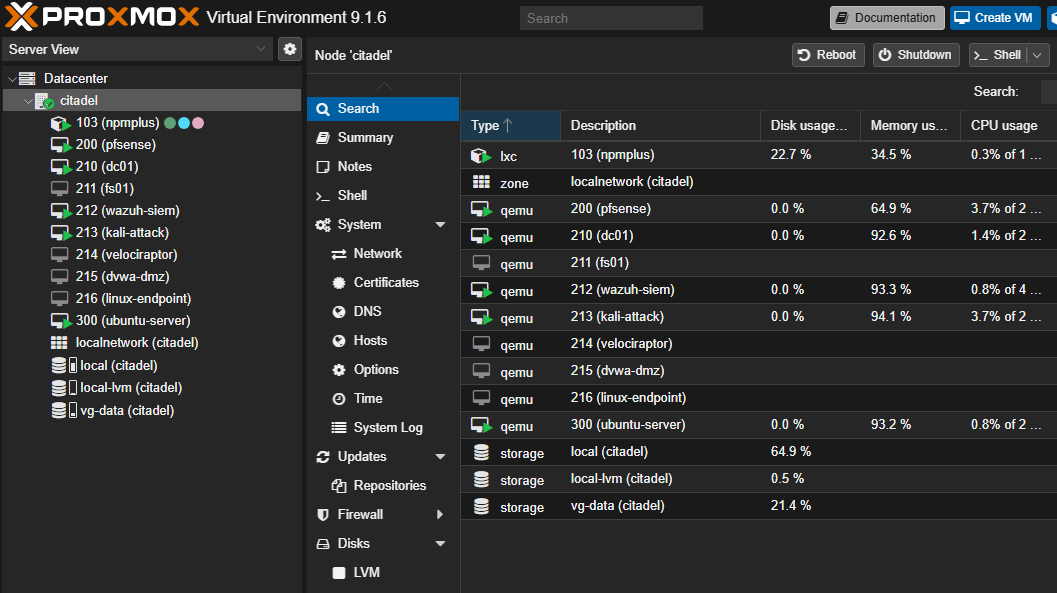
Everything runs on Citadel, my Proxmox node dedicated to security lab work. The specs aren’t impressive on paper but they’re enough for what we’re doing: Intel i5-10400, 32GB RAM, a 238GB NVMe for the OS and VM storage plus a 931GB HDD for larger disks. Proxmox 9.1.6.
The network segmentation was already partially in place from a previous NIST CSF lab. I kept the same bridge layout and rebuilt the VMs fresh on top of it.
Five VMs make up this lab:
| VM | Role | IP | Zone |
|---|---|---|---|
pfsense |
Firewall + segmentation | existing | all zones |
wazuh-siem |
Wazuh SIEM + dashboard | 10.10.10.20 | Management (vmbr1) |
dc01 |
Windows Server 2022 AD | 10.10.20.10 | Corporate (vmbr2) |
kali-attack |
Attack simulation | 10.10.30.10 | Workstation (vmbr3) |
linux-endpoint |
OpenSCAP compliance target | 10.10.20.30 | Corporate (vmbr2) |
The linux-endpoint VM at 10.10.20.30 is the OpenSCAP compliance target. It doesn’t get much attention in Part 1 but it’s the star of the compliance scanning section in Part 2.
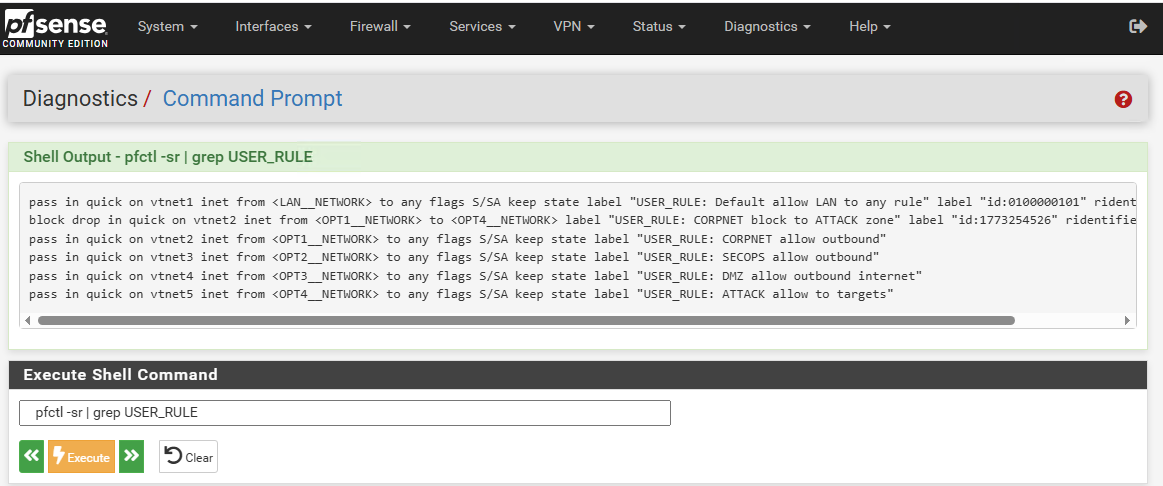
pfSense sits between all of them. Management zone can see Corporate. Corporate can’t reach the Workstation zone where Kali lives. Kali can only reach what the firewall rules explicitly allow. That segmentation is what makes the attack simulation meaningful in Part 2.
Why Wazuh
I’ve been running Wazuh in my homelab for general security monitoring. For this lab it was the obvious choice, but not just because I know it. The compliance dashboards are built in. NIST 800-53, PCI DSS, GDPR, and HIPAA tabs are all there out of the box. Wazuh doesn’t have a dedicated ISO 27001 dashboard, but NIST 800-53 and ISO 27001 Annex A share significant control overlap, particularly in access control, audit logging, and configuration management. When Part 2 comes and I’m mapping Annex A controls to real evidence, the SIEM is already collecting the right data. I don’t have to build that from scratch.
Security Onion is the other serious option for a lab like this. It bundles Suricata and Zeek for network-level visibility which Wazuh doesn’t do natively. If this were purely a network forensics lab I’d go that route. But for a compliance-focused lab where the goal is demonstrating control implementation, Wazuh wins. It gives you the evidence layer, not just the detection layer.
Snapshots Before Anything Else
Before touching any existing VMs, snapshot everything. I had pfsense and dc01 from a previous lab that I wanted to preserve in case I needed to roll back.
qm snapshot 200 pre-compliance-lab
qm snapshot 210 pre-compliance-lab
qm snapshot 212 pre-compliance-lab
qm snapshot 213 pre-compliance-lab
I also had an old elastic-siem VM sitting at 150GB on my storage pool, stopped and unused. Rather than creating a new VM and wasting space, I snapshotted it, renamed it, wiped the disk, and reinstalled Ubuntu 22.04 on top of it. Clean enough for a lab.
qm set 212 --name wazuh-siem
qm set 212 --net0 virtio,bridge=vmbr1
qm set 212 --ide2 local:iso/ubuntu-22.04.5-live-server-amd64.iso,media=cdrom
qm set 212 --boot order=ide2;scsi0
dd if=/dev/zero of=/dev/vg-data/vm-212-disk-0 bs=1M count=1000
qm start 212
Worth doing the dd wipe before reinstalling on a used disk. Without it you risk the new Ubuntu installer seeing partition remnants from the old Elastic install and behaving unpredictably. Takes about 30 seconds.
Installing Wazuh
I’ve covered the full Ubuntu 22.04 setup and Wazuh installation in previous posts if you want the step-by-step detail. For this lab, the short version: Ubuntu installed clean with a static IP at 10.10.10.20, SSH enabled, updates applied.
For the Wazuh install, the -a flag handles everything in one shot. No manual config editing, no running components separately. It installs the indexer, manager, and dashboard together on a single node.
curl -sO https://packages.wazuh.com/4.11/wazuh-install.sh && sudo bash ./wazuh-install.sh -a
Takes about 10 minutes. When it finishes it prints your admin credentials to the terminal. Save them before you clear the screen. If you miss them, they’re recoverable with:
sudo tar -O -xvf wazuh-install-files.tar wazuh-passwords.txt
But it’s easier to just copy them on first run.
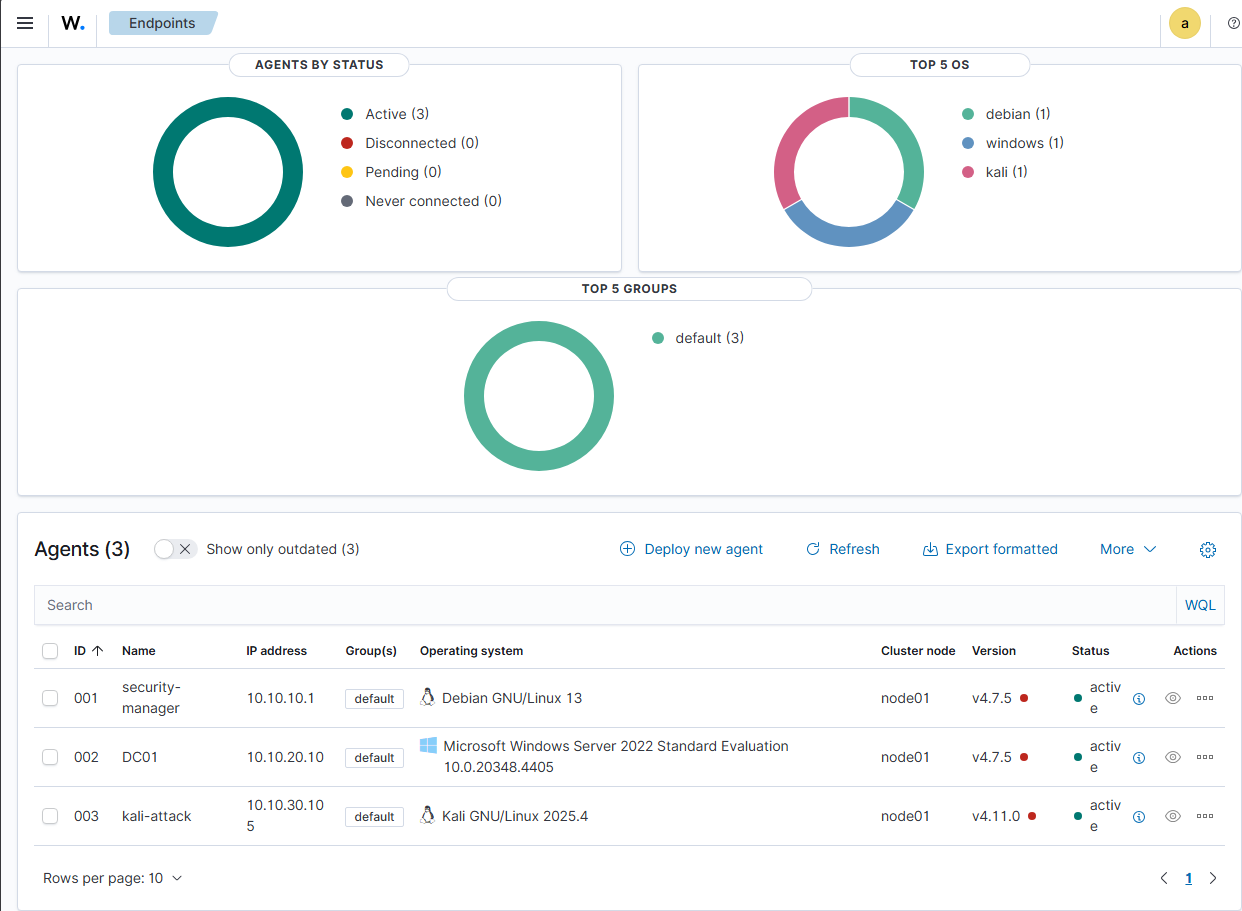
Dashboard comes up at https://10.10.10.20. First login looks like this:
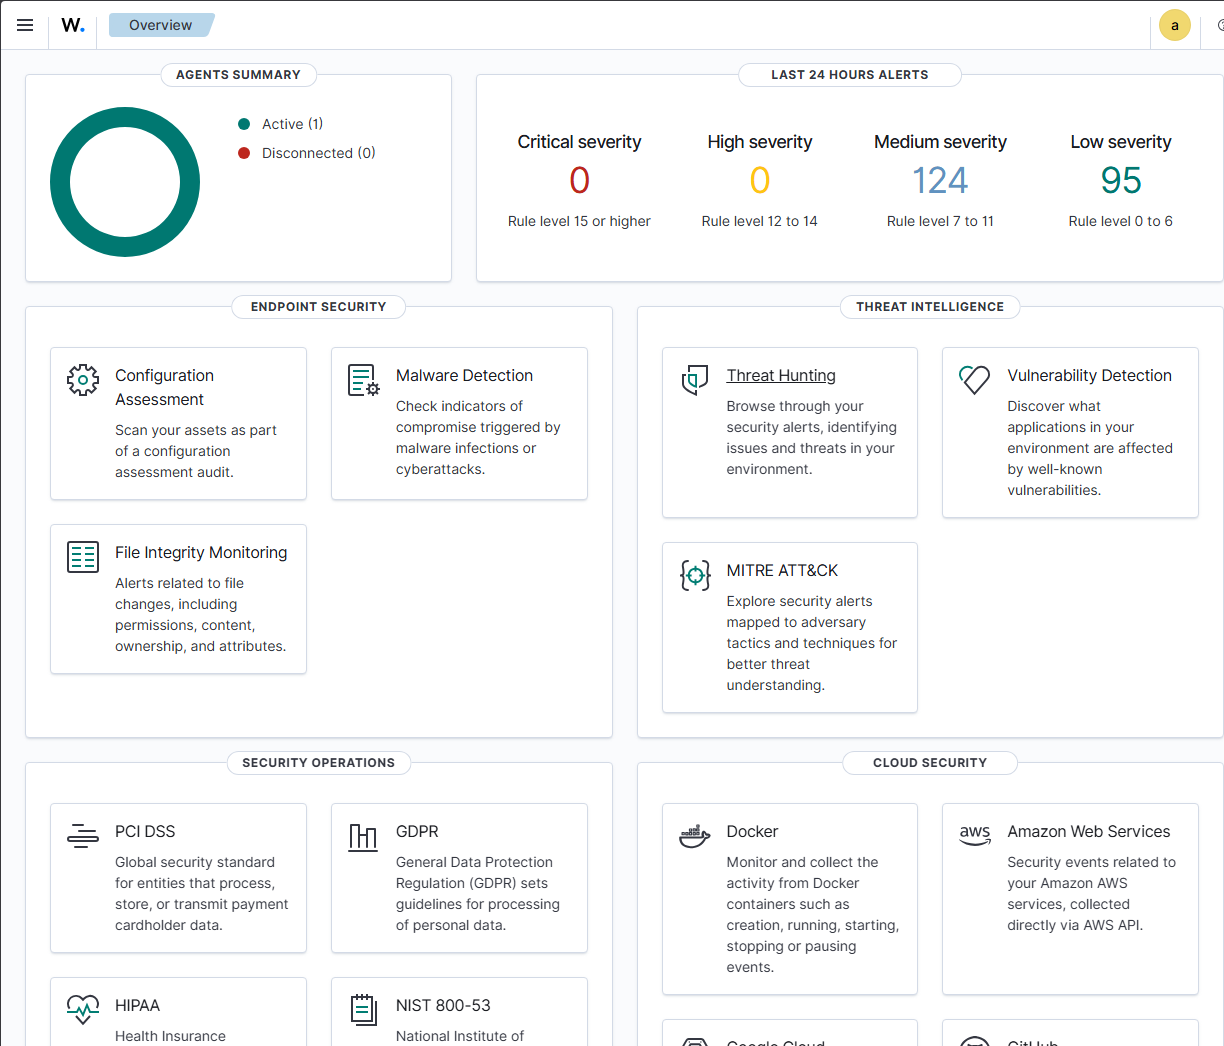
Notice the Security Operations section at the bottom. NIST 800-53 is already there. That’s what we’ll be drawing on across Parts 2 and 3.
Setting Up Active Directory on dc01
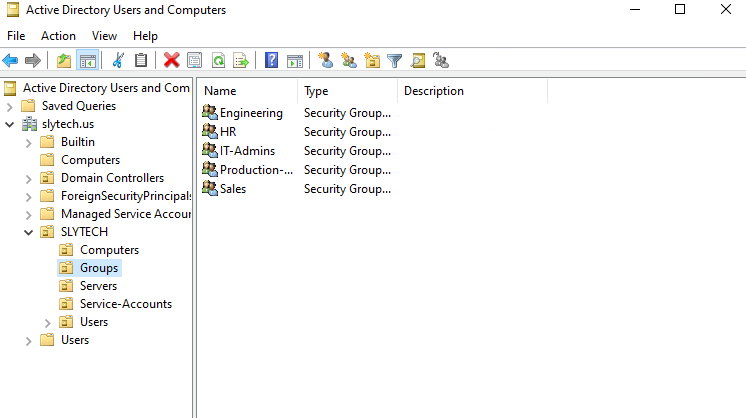
dc01 was already running Windows Server 2022 from a previous lab with the slytech.us domain configured. I kept it as-is. The OU structure had Engineering, HR, IT-Admins, Production, and Sales groups already set up, which is exactly the kind of environment ISO 27001 access control policies apply to.
Getting RDP access to dc01 from outside the lab network was the first friction point. dc01 sits on 10.10.20.x and my main workstation is on 10.0.0.x. The clean fix was adding dc01 to Tailscale directly.
winget install tailscale
Authenticate, and dc01 gets a Tailscale IP reachable from anywhere on my tailnet. No port forwards, no SSH tunnels. I do the same for Kali later.
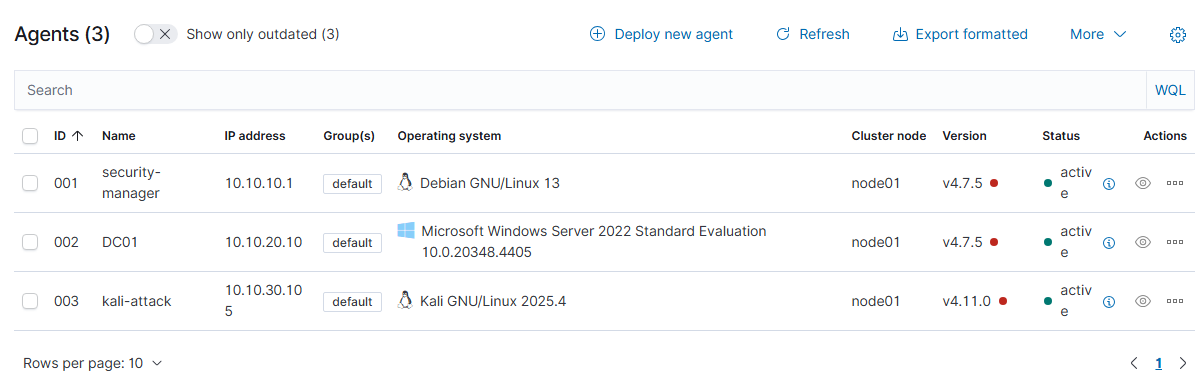
Deploying Wazuh Agents
With the dashboard up, I deployed agents to dc01 and kali-attack through the built-in deploy wizard at Agents → Deploy new agent. The wizard generates the exact install command for each OS. For Windows it’s a PowerShell one-liner. For Linux it’s a dpkg install with the manager IP injected as an environment variable.
# On kali-attack
wget https://packages.wazuh.com/4.x/apt/pool/main/w/wazuh-agent/wazuh-agent_4.11.0-1_amd64.deb
sudo WAZUH_MANAGER='10.10.10.20' WAZUH_AGENT_NAME='kali-attack' dpkg -i wazuh-agent_4.11.0-1_amd64.deb
sudo systemctl enable wazuh-agent && sudo systemctl start wazuh-agent
Both agents showed up active within a minute of starting the service.
Installing Kali
VM 213 already existed with 3GB RAM and 40GB disk. I mounted the Kali 2025.4 installer ISO and ran the graphical install.
qm set 213 --ide2 local:iso/kali-linux-2025.4-installer-amd64.iso,media=cdrom
qm set 213 --boot order=ide2;scsi0
qm set 213 --net0 virtio,bridge=vmbr3
qm start 213
One thing to watch: after the install finishes and you hit Continue to reboot, Kali will boot straight back into the installer if you don’t eject the ISO first. The installer doesn’t do it automatically.
qm set 213 --ide2 none,media=cdrom
qm set 213 --boot order=scsi0
qm reset 213
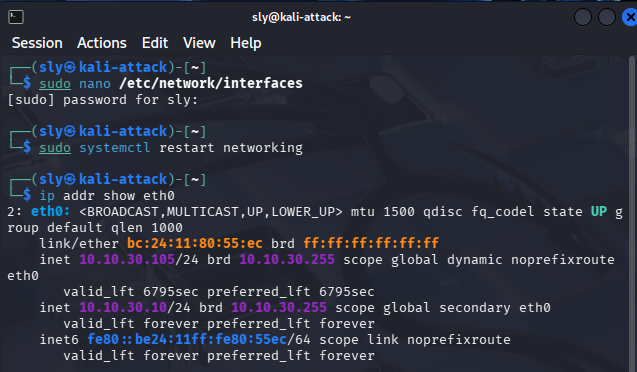
After booting into the desktop, the network config needs to be set manually since vmbr3 doesn’t have a DHCP server. Kali grabbed a random IP during install but I set it static after first boot:
sudo nano /etc/network/interfaces
auto eth0
iface eth0 inet static
  address 10.10.30.10
  netmask 255.255.255.0
  gateway 10.10.30.1
  dns-nameservers 10.0.0.1
sudo systemctl restart networking
Then Tailscale and SSH:
curl -fsSL https://tailscale.com/install.sh | sh
sudo tailscale up
sudo apt install openssh-server -y
sudo systemctl enable ssh && sudo systemctl start ssh
Kali is now reachable remotely over Tailscale for attack simulation in Parts 2 and 3.
Where Things Stand
The foundation is solid. pfSense is segmenting four zones, Wazuh has three active agents reporting in, dc01 is running a real AD structure, and Kali is isolated and ready. That’s the environment ISO 27001 and NIST controls will actually run against.
Part 2 is where the compliance work starts.
What’s Next
The lab is up, the agents are reporting, and the SIEM is collecting. Infrastructure done. Now the real work starts.
Part 2 takes this environment and maps six ISO 27001 Annex A controls to it manually. No compliance dashboard doing the work for you. Group Policy for access control, Wazuh for logging and incident detection, OpenSCAP for vulnerability management, pfSense for network segmentation. Each one gets real evidence behind it, the kind you’d actually present in an audit.